Introduction

Who Should Read This Guide

This guide is written for those who will be creating and maintaining documentation using the MAGEC Documentation Facility. And those who will be planning the documentaion of applications, especially those developed using MAGEC.

Copies of this guide should be distributed to:

  • Documentalists
  • Application Developers
  • Auditors
  • Supplemental Reading

    This guide is written assuming that the reader is familiar with the overall MAGEC philosophy. It presumes that you understand how the "standard set of nine" functions work and that you are familiar with the standard screen formats of MAGEC. We suggest that you first read the manual titled Application User's Guide if you have not already.


    Overview

    Purpose

    The MAGEC Documentation Facility is used to store, retrieve, and maintain documentation which is to be accessed both in hardcopy format and online via the built-in MAGEC HELP Key feature. Documentation can be loaded via an offline (batch) utility or it can be keyed into the online maintenance screens provided. A special two-file scheme is used to eliminate the need to key redundant explanations or instructions, allowing text for any "topic" to be referenced and included into an unlimited number of hardcopy manuals or online HELP displays.

    The MAGEC Documentation Facility may be used to document virtually anything; however, the primary use of it will probably be to document online applications developed using MAGEC. It is the belief of the authors of MAGEC that documentation is an integral part of any development project and that it must be done before any development effort can be considered complete. The intent of the documentation facility is to integrate the documentation effort into the normal application development processes.

    Creating or maintaining documentation may be done at the same time and in the same "session" as application developemnt or maintenance is done. The new or updated documentation is made available instantly to the application's users online and may also be printed to hardcopy if desired.

    What This Book Will Tell You

    This book will explain the philosophy of the documentation facility, the "mechanics" of it, and how to use it. It will show you:

  • the structure of the files
  • how to load documentation offline (in batch)
  • how to unload, replace, or delete it offline
  • how to print it offline
  • how to enter or modify it online
  • how to reference it from your online applications
  • how to find documentation via the built-in menu system
  • how to reduce effort and simplify maintenance by avoiding redundancy

  • File Structure

    The DOC & REF Files

    The two files involved in the MAGEC Documentation Facility are:

    the DOC file     (Documentation file)

    the REF file     (Reference file)

    The DOC file is the one which actually contains the documentation text that you key in or load to the system. The REF file is used as an index for the DOC file. Together they make up an extremely flexible and efficient documentation "library".

    DOC File

    The DOC file consists of records having a 32-character key value and one screenful of text per record. Actually we usually perceive of the data on the file as "books" or "topics" of documentation, each made up of from 1 to 99 records. The records are made-up of:

    Topic name     30 characters maximum

    Page number     2 digits, 01 thru 99

    Text      15 lines, 72 characters per line

    The actual file key on the DOC file consists of the Topic name plus the Page number. As you can see, you may have up to 99 "pages" of text for any given topic. When an application user is viewing the documentation online via the online HELP key, each screenful of display is actually one record from the DOC file.

    The topic name may be any name up to 30 characters in length with embedded blanks (spaces) allowed. Examples of acceptable topic names are:

    CUSTOMER NUMBERS

    Adding a Customer

    INQUIRIES & BROWSES

    A few special characters are not allowed in topic names. You may not use the special characters slash ( / ) or apostrophe ( ' ) or quote ( " ) in topic names. These characters have special, reserved meanings for all MAGEC applications when used in the screen key (SKEY) area. Aside from those few restrictions you may be as creative as you like with your names.

    Lowercase Characters

    You may make up names which include lowercase alphabetics if you like. The quote ( " ) and apostrophe ( ' ) are used to indicate lowercase alphabetics in the SKEY area according to MAGEC standards. The MAGEC Application User's Guide explains the use of quote and apostrophe for entering lowercase key values.

    The text is completely free-form and may contain any character that can be displayed at a terminal with the exception of the underscore ( _ ). If you would like your hardcopy documentation to show the underscore character or underlining then you must follow the procedure given in the "Offline Utilities" chapter, MAGECLBR section under Skip and Space - Overprinting/Underlining.

    REF File

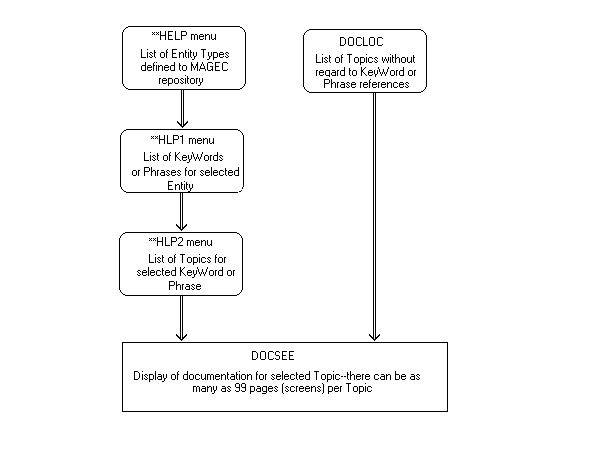
    The REF file is used to record references to topics on the DOC file. The online HELP displays of documentation use the REF file to control which topics are to be presented for which functions.

    The REF file records consist of:

    Keyword (or phrase)     30 characters maximum

    Entity type     4 characters

    Topic name     30 characters maximum

    Any keyword may be referenced to any number of topics. Any topic may be referenced by any number of keywords.

    The keyword (or phrase) may be made up of any 30 characters with restrictions similar to those for topic name regarding special characters. For the purposes of the online HELP functions we will be concerned only with keywords which are six-character function codes; but some planned enhancements to MAGEC will likely use the REF file with other types of keywords or phrases.

    The entity type is a four-character code which must be defined on the MAGEC lookup table # 250 in order to be accepted. This code defines what the keyword is. For instance, some of the entity types which are pre-defined with the MAGEC software are:

    FUNC     Online function code

    BPGM     Batch program

    FILE     File

    Therefore, it is possible that you might have an online function code of CUSCHG as well as a batch program named CUSCHG. The Entity type enables you to record references to them and to distinguish between them. The online HELP functions only look at REF file entries with an entity type of FUNC; however, planned enhancements will use other entity types.

    You can define your own new entity types for your own purposes by simply defining them on the lookup table # 250 using the standard functions:

    TBLADD 250/xxxxx TBLCHG 250/xxxxx

    REF File Relates Entities to DOC

    Figure 01 -- REF File Relates Entities to DOC


    Offline Maintenance

    How to Load in Batch

    If you wish to load documentation which you have stored somewhere other than the MAGEC documentation files, you can use the MAGECLBR batch utility program. MAGECLBR is used for many operations besides the documentation files, the MAGEC Library, and the Data Dictionary. In this chapter we will only discuss those functions pertinent to documentation. Full explanation and instructions regarding the use of MAGECLBR are included in the chapter titled "Offline Utilities." Here we will simply try to "point" you to the right operation to do what you want to do. If you are not familiar with MAGECLBR then you should refer to the that chapter.

    To initially load a "topic" of documentation via MAGECLBR you would use a control card of:

    -MAGECADD DOC tttttttttttttttttttttttttttttt eeee where: ttttt...ttt               = 30-character topic name, begins in column 15

    eeee               = entity type, begins in column 51

    Always check the output listing for errors. If there are no errors then it will tell you how many pages were added and also that a "prime reference" was added. This is because there is a requirement that there always be at least one reference on the REF file for every topic on the DOC file. The prime reference will be a record on the REF file with the topic name you specified as both the keyword and as the topic name. The entity type will be what you specified on your control card, it must be valid as defined on the lookup table # 250. As an example: if you specified a topic name of "CUST FILE" and an entity type of "FILE", the prime reference that would be automatically generated on the REF file would be:

    Key Phrase     Type     Topic     
    CUST FILE      FILE      CUST FILE

    Remember, there is a limit of 99 pages for a topic. Very long pieces of documentation must be broken down into multiple topics. You can later concatenate them for printing. One technique is to assign topic names such as:

    ORDER OF THE UNIVERSE (1) ORDER OF THE UNIVERSE (2)

    Using the sequence number at the end to create unique, but obvoiusly related, topic names. This naming technique is especially useful to handle extremely large topics which have been split into multiple smaller topics. There is no limit to the number of topics which you can concatenate for printing nor to the number of total pages. You could conceivably print an entire encyclopedia by concatenating many topics.

    How to Update in Batch

    There is no batch facility for updating portions of a topic; you can, however, completely replace a topic in batch. When you replace a topic MAGECLBR will first delete all the pages for it and will then add the new documentation.

    You should not see any mention on the output listing of the prime reference since it should already have been on file.

    To replace a topic use MAGECLBR with a control card of:

    -MAGECREP DOC tttttttttttttttttttttttttttttt where: tttt...ttt               = topic name, begins in column 15

    Notice that entity type is not given.

    How to Unload in Batch

    If you wanted to "punch" out (export) a topic of documentation you could also use MAGECLBR to do that. It will "punch" out 80-column "cards" to the punch queue (DOS) or to any data set or PDS (OS).

    One reason you might want to punch a topic would be to update it using another text editor, such as ISPF, ICCF or CONDOR, possibly merging in some new text you have stored there. You could then take the results and replace the topic on the MAGEC files as described above.

    To punch out a topic, use MAGECLBR with a control card of:

    -MAGECPUN DOC tttttttttttttttttttttttttttttt

    How to Delete in Batch

    If you want to entirely delete a topic you must do it using the batch MAGECLBR utility. There is no online delete capability for the documentation (DOC) file. This is both to protect the integrity of the files and to avoid potentially inefficient processes online.

    To delete an entire topic use MAGECLBR with a control card of:

    -MAGECDEL DOC tttttttttttttttttttttttttttttt

    MAGECLBR will first look up and delete all references, including the prime reference, on the REF file, then it will delete the topic. Remember, there is no limit to how many references there might be. Now you see why we do not want to to this particular operation online.

    How to Print Documentation

    The thing you will probably do most often offline regarding the documentation is to print it. The MAGECLBR utility is also used to print hardcopy documentation from the DOC file. It does not look at the REF file, instead it allows you to control which topic(s) are to be printed using control cards.

    To print a topic from the DOC file use MAGECLBR with a control card of:

    -MAGECPRT DOC tttttttttttttttttttttttttttttt

    It will print the topic and will produce, automatically, a page index and table of contents for you. You have the ability to control page numbering and headings and many other useful things by inserting the special control statements into your documentation as described fully in the "Offline Utilities" chapter under MAGECLBR.

    The printing feature of MAGECLBR is intended to permit you to produce very "finished" looking hardcopy documentation. We suggest that you take the time to study all the capabilities defined in the other chapter in order to fully utilize the feature.

    You can concatenate topics to cause them to be printed as if they were all one topic on the file, regardless how many or what size they are. This enables you to print manuals which are much larger than one topic could contain (in 99 records). There is no limit as to how many topics you may concatenate nor to how many records or pages they may consist of.

    To print a manual made up of more than one topic from the DOC file use MAGECLBR with a control cards as:

    -MAGECPRT DOC tttttttttttttttttttttttttttttt C

    -MAGECPRT DOC ssssssssssssssssssssssssssssss C      |      | -MAGECPRT DOC llllllllllllllllllllllllllllll

    where: tttt...tt               = the first topic name

    sss...ss               = the second topic name

    lll...ll               = the last topic name

    The "C" in column 45 indicates to MAGECLBR that the following topic is to be concatenated or is a continuation of this one.

    Headings, Index, and Page Numbers

    When you print your documentation using MAGECLBR you can also allow it to automatically generate headings, titles, and page numbers and to automatically create a table of contents and page index for you. To do that you would use the control cards:

    **HDG**      for headings

    **IDX**      for index entries

    **TTL**      for titles

    **PAG**      to control page numbering

    You should refer to the "Offline Utilities" chapter for more detailed information about these control cards.


    Online Maintenance

    DOCxxx Functions

    Online maintenance to documentation on the DOC file is accomplished using the DOC . . . functions provided and the documentation maintenance screen.

    Displaying Online

    Figure 02 depicts the documentation maintenance & display screen as it would appear for displaying a "page" of documentation. To display a page of documentation you would enter:

    DOCSEE tttttttttttttttttttttttttttttt where: tttt...tt               = the desired topic name

    You do not enter the page number with the key (topic name). What will be displayed to you will be the first page (usually page 01) of the topic, its page number will be shown in the area titled PAGE: on the screen. If you wish to go to another page then you may simply key the desired page number over the one shown and press ENTER, the next display will be the page you have specified (if it exists).

    Since most topics are more than one page long and since it is very common to want to "browse" through the text to find the area in which you wish to make some change, you will notice that the DOCSEE function code you entered is automatically changed to DOCNXT when the page is displayed to you. The DOCNXT function works very much like all standard . . .NXT functions in MAGEC, it gets the next record (page) and displays it to you when you press ENTER, unless you have altered either the topic name in SKEY (top line of screen) or the page number in the body of the screen. If you change either of these then DOCNXT assumes you wanted to see some record other than the next one and it automatically does a DOCSEE for it.

    You can also browse "backwards" using DOCNXT. If you would like to see the previous page rather than the next page then press PF7 instead of ENTER.

    
     DOCxxx tttttttttttttttttttt
    
    SEARCH ARG: ................................................................
    ...
    M A G E C DOCUMENTATION MAINTENANCE/DISPLAY
    PAGE: 01
     TOPIC NAME: ttttttttttttttttttt
      ...;+..;10....+...20....+...30....+...40....+...50....+...60....
    +...70..


    SEMICOLON (;) IS THE TAB CHARACTER - THE RULER LINE INDICATES TAB POSITIONS
     Press PF12 to return to HELP menu  Press PF4 for browse (LOC) Screen

    Figure 02 --  Documentation Display Screen

    Finding Documentation

    An online facility is built into MAGEC to enable you to find documentation at your screen. It includes a three-level "menu" to help you to choose among all the many topics stored in the documentation file (the DOC file) by navigating down through the natural heriarchy of the dictionary.

    To begin, you enter the function code: **HELP. You will be presented a list of Entity Types defined to the MAGEC dictionary (in Table #250). You can choose one by positioning the cursor to the line it is displayed on and pressing ENTER. The list may be more than one page (screenful) long. If you wish to page forward, just press ENTER without cursor-selecting an Entity Type.

    When you select an Entity Type you will be presented a list of Keywords (or Key Phrases). They will be the ones associated with the selected Entity Type. For example, if you chose an Entity Type of FUNC (online function codes), you would receive a list of keywords which were online function codes; if you selected an Entity Type of BPGM (batch programs), you would receive a list of keywords which were batch program names, and so forth. Your list could continue for multiple pages, to page forward just press PF8 or ENTER. When you see the Keyword or Phrase you are interested in, point to it with the cursor and press ENTER.

    When you cursor-select a Keyword or Phrase, as described above, you will then be presented a list of Topics from the MAGEC documentation file. They will be those topics which are referenced by (associated with) the Keyword or Phrase you have selected. This list may also continue for multiple pages, you can just press PF8 or ENTER to page forward. When you see the Topic you are interested in you can cursor-select it and press ENTER, you will be displayed the first page (screenful) of text for that Topic.

    As you browse through the selected Topic you can page forward by pressing ENTER or PF8, or page backward by pressing PF7 (F7, on a PC). When you are through reading it, you can press PF12 (Shift-F2, on a PC) to return to the Topics list.

    At each level of the selection menus the PF12 (Shift-F2, on a PC) key will take you back up to the prior menu. If your security authorization permits you to modify documentation, you can do so while you are browsing through the Topic. To do that you would alter the function code (SFUNCT) to DOCCHG, key in your changes, and press ENTER.

    Another way you can look for a Topic in the DOC file is by simply browsing through it using the DOCLOC function. The DOCLOC screen is merely a list of Topics, in alphanumeric order, which are on the file. They are not organized by Keyword references. This method is handy when you know the Topic (and how it is spelled, approximately) that you want to view. You do not need to enter the complete Topic Name as a key value in SKEY (though you could), you could enter only the first few characters of it or just enter a "1" to start browsing at the beginning of the file. As with all lists in MAGEC, you can cursor-select the item you are looking for by positioning the cursor to it, when it is shown in the list on the screen, then you can press ENTER and be immediately presented the DOCSEE display of the first page (screenful) of text for the Topic you chose.

    Finding Documentation

    Figure 03 --  Finding Documentation

    Scans of Text

    You can use the DOCNXT function to search for a sequence of characters in your text also. To do a search, you do exactly the same as you would to display and browse (DOCSEE, DOCNXT) but you also enter the character string you would like to find into the SEARCH ARGument area.

    Your search argument may be up to 66 characters in length. DOCNXT will sequentially search each page of text either browsing forward or backwards (depending on PF8 or PF7 key) looking for the character sequence you have given. When it finds a "hit" it stops searching and displays the page to you with the line(s) on which it found the hit highlighted (bright display or colored red, depending on your terminal).

    If you would like to continue searching for the same search argument then you may just press ENTER or PF8 or PF7 again, leaving everything else alone on the screen. It is OK to change directions as often as you like by using the PF8 and PF7 keys, therefore you can search forward to find all the hits and then "back up" to the one you are interested in.

    You may also change the search argument at any time by simply overkeying it on the screen; thus you might want to "position" forward to the major section of your text in which you are interested and then search for a certain phrase starting at that point, or from that point backwards.

    At any time while you are browsing or searching through your text you may decide that you have found the place where you wish to make some changes. To do so you simply alter the function code from DOCNXT to DOCCHG and press ENTER, You will then see the screen returned to you in maintenance mode for the page you were looking at.

    Updating Online

    Figure 04 depicts the documentation maintenance/display screen as it will appear when you are updating documentation online. It is almost identical to the display mode screen except that:

  • you can key over the displayed text
  • the search argument area is gone
  • the TAB OPTION area appears at the top of the screen
  • You may, at any time, go directly to the maintenance screen by entering the proper function code and topic name, such as:

    DOCCHG tttttttttttttttttttttttttttttt Again, you do not enter the page number until the screen is returned to you defaulting to the first page of the topic. From that point on you can overkey the page number to "jump around" through the text if you wish.

    Since it is difficult to remember page numbers, you will probably prefer to use the browse and scan functions to position yourself before updating.

    
     DOCxxx tttttttttttttttttttt
    
    TAB OPTION: ON  <==ON OR OFF
    M A G E C DOCUMENTATION MAINTENANCE/DISPLAY
    PAGE: 01
    TOPIC NAME: ttttttttttttttttttt
      ...;+..;10....+...20....+...30....+...40....+...50....+...60....
    +...70..


    POSITION CURSOR ON A LINE AND USE PF19 TO DELETE IT -OR- PF20 TO INSERT AFTER IT
    SEMICOLON (;) IS THE TAB CHARACTER - THE RULER LINE INDICATES TAB POSITIONS
     Press PF12 to return to HELP menu  Press PF4 for browse (LOC) Screen

    Figure 04 --  Documentation Maintenance Screen

    Adding Lines

    The DOCCHG function may be used to insert new lines of text into existing pages even if they are "full" (all 15 lines used). To insert new lines you position the cursor to the line you want to insert after and press PF20. You may then key in your new lines and press ENTER. If an "overflow" condition occurs (more than 15 lines) then DOCCHG will automatically add a new page behind the one you are updating and/or shift all following text down one page to accommodate the added lines.

    Deleting Lines

    To delete lines of text you may position the cursor onto the line to be deleted and press PF19, then press ENTER. The selected line will be gone and the following lines will be shifted up to fill in the space.

    It is not absolutely necessary to actually delete lines, however. You can accomplish the same thing in most cases by just "blanking" it out (using ERASE EOF key, if desired). If you just blank out a line, then the following lines will not be shifted up. When you print your documentation all blank lines are dropped anyway so it may not matter. The exception is for those topics which are to be displayed online using the HELP key facility. You may not want all those blank lines to appear to the application user for aesthetic reasons.

    Adding Pages

    If you insert lines using the PF20 key it is likely that you will be causing DOCCHG to add pages (records) to the end of the topic in order to contain the overflow (shifed-down lines). Thus, you are actually adding pages by adding lines in many cases. Sometimes you might wish to explicitly add a new page to a topic, usually at the end. You can do that using the command:

    DOCADD tttttttttttttttttttttttttttttt

    Again, you enter the page number into the body of the screen after it is displayed to you and not into the SKEY area.

    You can key in a screenful of text and press ENTER. Unless some error is detected you should receive a screen back displaying the new page using the DOCSEE function. The DOCADD function does not support the PF19 and PF20 keys as the DOCCHG function does, it is a "data entry" type of function.

    Adding a New Topic

    You can use the DOCADD function to add an entirely new topic just as you added a page to an existing topic. You do so in exactly the same manner with one difference -- when you are adding the first page of a new topic, then DOCADD must also add the prime reference to the REF file.

    If DOCADD detects that this is the first page (there are no others on file) for the topic then you will see another special item appear on the screen. It is titled: TYPE. In it you must enter the entity type to be used in generating the prime reference. It must be a valid type defined on lookup table # 250.


    Defining References

    Relating Keywords to Topics

    The REF file is used to define the relationships between any keyword (or key phrase) to any topic (or topics). This technique permits you to reference any number of topics by a keyword and permits you to reference any topic from any number of keywords. Please note that there is no difference between a "keyword" and a "key phrase", they are simply two interchangeable terms. Since MAGEC allows you to make up keywords consisting of up to 30 characters with embedded blanks if you like, it is often likely that the term "key phrase" will be more descriptive than "keyword". From here on in this book we will standardize on the term "keyword". You know that that could also mean an up-to 30-character phrase.

    One of the main uses for these stored relationships is for the online HELP facility. When an application user presses the HELP (PF1 or Ctrl-F1) key requesting online documentation, MAGEC determines which topics are to be displayed by looking at the function code on the screen and then looking up that function code as a keyword on the REF file. It does that by building a key value using the function code as the keyword and "FUNC" as the entity type. For instance, if the operator was doing the function code "CUSADD" and pressed HELP, then MAGEC would look on the REF file looking for:

    Keyword     Entity Type

    CUSADD     FUNC

    This could be described as looking for the references for the online function code "CUSADD" since FUNC is defined as meaning online function code. There might be none, or one, or even many found.

    Let us assume that there were three references on file:

    Keyword     Entity Type     Topic

    CUSADD     FUNC     ASSIGNING NEW CUSTOMER NUMBERS

    CUSADD     FUNC     CUStomer file maintenance

    CUSADD     FUNC     NEW CUSTOMER CREDIT LIMITS

    MAGEC would first display to the operator the first page of the first topic, ASSIGNING NEW CUSTOMER NUMBERS. If there was more than one page of text for that topic it would next display (when he/she hits the ENTER key) the second page and so on until it reached the last page for that topic. Then it would display the first page for the next topic, etc., until it reached the last page for the last topic. Of course, the operator could exit the HELP facility at any time by pressing PF3 (F3, on a PC) to return immediately to the application screen. If your online text is too wordy then they will probably use the exit option frequently.

    Now, suppose that you also had a batch program named CUSADD and you also had documentation on file for it. You might have some references on the REF file as:

    Keyword     Entity Type     Topic

    CUSADD     BPGM     ASSIGNING NEW CUSTOMER NUMBERS

    CUSADD     BPGM     NEW CUSTOMER REJECT REPORT

    Since the entity type is not FUNC, the online HELP facility will ignore and bypass these references. Notice also that it is perfectly legal to reference the same topic from any other entity types or other keywords. This allows you to document a given topic once and to reference it from many places, simplifying maintenance of your documentation and reducing work for you.

    Avoid Redundancy

    We suggest that you first gain an understanding of the use of the REF file and that you plan your documentation so as to take full advantage of it to minimize your work. When you are documenting an online application which includes functions to add, change, delete, inquire, and browse through a file or database then you will probably find that many of the topics you need to cover will apply to more than one of the functions. It would be wasteful to repeat the same explanations and instructions for, let us say, both the ADD and the CHG functions when you could store it as a single topic and reference it from both functions using the REF file. Then when you find you need to make a change to the topic, your change will automatically be effective for both the ADD and the CHG functions.

    An example of how this might look is:

    Keyword     Entity Type     Topic

    CUSADD     FUNC     ASSIGNING NEW CUSTOMER NUMBERS

    CUSADD     FUNC     CREDIT RESTRICTIONS

    CUSCHG     FUNC     ADDRESS CHANGES

    CUSCHG     FUNC     CREDIT RESTRICTIONS

    With just a little forethought and planning you can see that your work can be made much easier and the results will be first rate.

    Adding References

    There is no batch (offline) facility for adding references to the REF file except that MAGECLBR will automatically add the prime reference when a new topic is added. In most cases you will probably want to add references in addition to the prime reference, you can do that online using the REFxxx function codes provided. To add a reference enter:

    REFADD kkkkkkkkkkkkkkkkkkkkkkkkkkkkkk where: kkkk...kk               = the keyword you wish to add a reference for

    The screen will be returned to you with underscores in the TYPE field and in the TOPIC NAME field for you to enter into them. The TYPE must be valid as defined on MAGEC lookup table # 250 and the topic name must exist on the DOC file. The keyword may be anything you like. For use by the online HELP facility the keyword will be six-character function codes.

    Changing a Reference

    There is no capability for changing a reference once it is on file since the entire REF record is actually the key to the REF file. If you wish to change a reference you should add the new, corrected reference using REFADD and then delete the old, incorrect one.

    Deleting a Reference

    To delete a reference enter:

    REFLOC kkkkkkkkkkkkkkkkkkkkkkkkkkkkkk

    You will be presented a list of reference records starting with the keyword you entered (the k's). Select the one you wish to delete by moving the cursor down to it and press ENTER. You will be presented the REFSEE screen displaying that REF record. Alter the function code to REFDEL and press ENTER, it will be deleted.

    
     REFxxx kkkkkkkkkkkkkkkkk
    

      M A G E C
      D O C U M E N T A T I O N R E F E R E N C E


      KEY PHRASE TYPE TOPIC NAME
    kkkkkkkkkkkkkkkkk ____  ________________________________


    Press PF4 for browse (LOC) screen  Press PF13 for Hardcopy
    Press PF16 to Copy field to buffer  Press PF17 to Paste data from buffer
    Press PF2 for field-level HELP

    Figure 05 --  Reference Maintenance Screen

    Default References

    When application developers initially generate their new online applications (MMP's) using the MMPCREAT job stream, MAGEC will automatically add default references to the REF file for each of the nine standard functions generated. For instance, if the developer is generating a customer maintenance application with the standard set of nine functions (CUSADD, CUSCHG, etc.) then it would add references as:

    Keyword     Entity Type     Topic

    CUSADD     FUNC     XXXADD FUNCTION

    CUSCHG     FUNC     XXXCHG FUNCTION

    There are nine topics on the DOC file which were installed when MAGEC was initially installed. These nine topics explain how to use each of the standard functions. Since MAGEC automatically adds these references when the application is initially generated, an application user who is trying to use a new application will receive at least some help even if the developer has not provided any of his/her own documentation yet.

    We do not suggest that the default documentation can take the place of your own explanations and instructions regarding your own applications. We hope that you will use the documentation facility to give your users the most complete and useful documentation that you can. You may feel that the default topics are useful and will thus want to leave these references on file in addition to the ones you add, or you may want to delete the default references and use just your own instructions for your applications.

    Automatic Technical Documentation

    You may have MAGEC produce hardcopy technical documentation of your applications' specifications at any time using the special offline utility named MSKDOC. To print technical documentation execute MSKDOC with a control card indicating the MSK number for which you wish documentation. Refer to the "Offline Utilities" chapter for details of the execution procedure and control card format.

    Application User's Guide

    Training new application users and familiarizing them with the system and environment is a time-consuming chore. You can save much effort and time by taking advantage of the MAGEC Application User's Guide manual which is provided for you with the MAGEC system. It describes all the standard features of MAGEC-generated applications and is written with the non-technical application user in mind. You can give your users that section of this manual in addition to the specific application documentation you yourself produce. Your own manuals need not re-explain those things which are "global" in nature and apply to all MAGEC applications.

    Field-Level HELP

    Another type of documentation and online HELP key is also provided by MAGEC. It is called Field-Level HELP. Field-Level HELP text is not stored on the DOC file, like other types of documentation. It is stored in the actual dictionary definitions for Data Items (DIT's). When the database administrator defines the database he also has the opportunity to provide free-form textual descriptions and explanation for each database field (DIT). When an online application user wishes to see HELP text for a given screen field, he/she merely points to that field using the cursor and presses the Field-Level HELP key (PF2). MAGEC builds a screenful of text consisting of two parts. The top half of the screen is text generated by MAGEC explaining the technical specifications for the selected screen field. The bottom half of the screen is text provided by the database administrator to describe the database source/target field for the screen field selected.

    If you execute the MSKDOC utility program which produces automatic technical documentation, as described earlier, the field-level HELP text will be printed along with other specifications for the application. Refer to the MAGEC "Offline Utilities" chapter for instructions on how to execute MSKDOC.

    The free-form text which makes up the lower half of the Field-Level HELP display can be added or updated by a database administrator. The DIT . . . functions are used. Refer to the "Database Administration") chapter for more information.

    If the operator points the cursor to a screen field which is a "table edited field" (see: Edit Types, refer to edit type T, table lookups) then the Field-Level HELP provides one additionial facility. When the help screen is displayed, there will be a message telling the operator that he/she can press PF8 to page forward. If PF8 is pressed the screen will then begin to list the table entries and their descriptions appropriate for the selected screen field. The operator may point to one of the displayed entries and press ENTER to select it -- the selected value will automatically be filled into the original screen field. This feature is called a "Pick List".

    Function-Level HELP

    Function-level online HELP is available to the terminal operator for any MAGEC-generated functions. The operator simply presses the PF1 key (High-level HELP key) to request it. The help text is stored on the DOC file. It may be of unlimited length. The Entity Type of "FUNC" associates Topics with function codes (see Avoid Redundancy and Default References earlier in this chapter). When the operator requests Function-level HELP, the MAGEC HELP facility presents one screenful of text at a time to the operator. He/she can use PF8 to page forward, PF7 to page backward, or PF3 to quit and return to his/her original screen at any time.

    Key HELP

    Help text can be stored for any file key just as it can for any function code. The Entity Type used for file keys is "KEYS". For example:

    Keyword     Entity Type     Topic

    CUSK1     KEYS     Customer Number key

    IVCK1     KEYS     Invoice number key

    You may have multiple Topics associated with any key name and you may have any Topic associated with many key names. When an operator mis-enters (on top line of screen) a key and receives the "Invalid Key Format" message, he/she may press PF1 (HELP) to be displayed the HELP text for that key. If no Topics are associated with a key name, a default format screen is generated.

    GUI Help

    If your application will be executed in a GUI environment, graphical, multi-media help can be integrated with it. This help will not be accessible when the applciation is executed in text mode.

    The MAGEC development functions, in GUI mode, include such online help which can be accessed by selecting Help, Tutorials from the menu bar, or by clicking the Help button on any of the development screens. MAGEC Software used the Compel product, from Asymetrix to develop this Help dialog. The Compel run-time component is invoked via Windows API call. You can produce your own Compel dialogs and can invoke them from within your applications. You can order Compel from you MAGEC representative.